Next: More about Pulldowns Up: Program Window Previous: Labels Contents Index
For auto-color the color will be based on a hashed filename so that whenever you load this particular media, it will always have the same color on the title bar even if you use proxy. To enable auto-color go to Settings → Preferences, Appearance tab and check on Autocolor assets. You will see this in the Flags section as shown in Figure 16.1. It is disabled by default. Each media will have a random muted color and there could easily be close duplicates as generated by the program algorithm. There will be no total black, but some dark shades are possible.
To change a specific clip to your own chosen color, right mouse button (RMB) over that clip and an Edits popup will be displayed. Choose the option Bar Color to bring up the color picker and choose a color. You can also change the alpha value in the color picker and this alpha takes precedence over the current alpha slider bar value unless the color picker's alpha value is set to 1.0. The color will only change after you click on the checkmark. The Bar Color option works in either Drag and Drop or Cut and Paste editing mode and also works if Autocolor assets is not set. In Drag and Drop editing mode, if you select several clips (reference "Create a group" in 5.5.4) and then bring up the Edits popup with the right mouse button over a track, you can use the Bar Color option to change all of those selected to the same color.
To go back to the default colors, uncheck Autocolor assets in Preferences, but this does not affect the specially chosen self-colored ones as they are preserved. To change these individually or selectively, use the Edits popup Bar Color option and click on Default in the color picker window.
And that’s not all! There is an alpha fader slider bar on the bottom of the main window on the right hand side of the Zoom Panel. With this alpha slider, you can colorize your video and audio tracks to either see only the color at 0.0 or see only the image at 1.0. This slider bar affects all colored areas of the Autocolor assets and the self-colored ones. In the case when a specifically changed edit alpha value is set in the color picker to any value except 1, the slider bar will not affect that. Once you use the slider bar, it is activated so gets first shot at any keystrokes in the main window. You deactivate this by simply clicking in a different part of the main window.
As long as we are on the subject of color, just a note that you can also change the Highlighting Inversion color in Settings → Preferences, Appearance tab. You can see this option in Figure 16.1 in the Color section. That setting defaults to white (ffffff) but sometimes this is a little bright so you can put any hex value in that suits you.
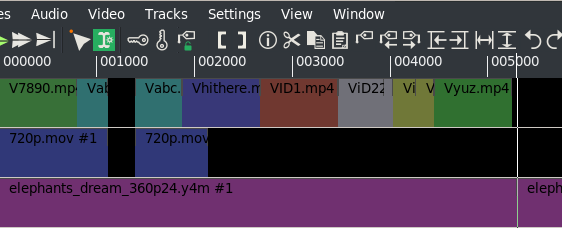
This image (figure 2.6a) shows an example of the Autocolor assets with alpha set to 0.0 so that you see only the color and no image. In this image (figure 2.6b), the alpha is set to show the image and waveforms with transluent colors. The pink media file has been self-colored rather than the autocolor to make it easy to see.
The CINELERRA-GG Community, 2021