Next: Cropping Up: Compositor Window Previous: Camera and Projector Contents Index
Masks can be used to accomplish various tasks but basically are used to select an area of the video to be displayed or hidden. They can be used in conjunction with another effect to isolate the effect to a certain region. Another usage is where you slightly delay one video track copy and unmask an area where the one copy has interference but the other copy does not. Or use a mask when color correction is needed in one part of a frame but not another. A mask can be applied to just a small section of a color corrected track while a plain track shows through. Removal of boom microphones, license plates, people and airplanes via mask is a very common usage.
The order of the compositing pipeline affects how masks are done. Usually masks are operated on the temporary, after the effects but before the projector. Because of the way this works, multiple tracks can be bounced to a masked track and projected with the same mask.
The compositing pipeline graph has a masking stage (figure 2.15).
The Mask popup menu can be overwhelming upon first encounter. However, if you follow the next few steps you can create a single simple mask without having to understand every possible parameter. Be sure you are working in a Format that includes the Alpha channel, YUVA or RGBA, because you need to have transparency for masking to show or will end up with only a black area.
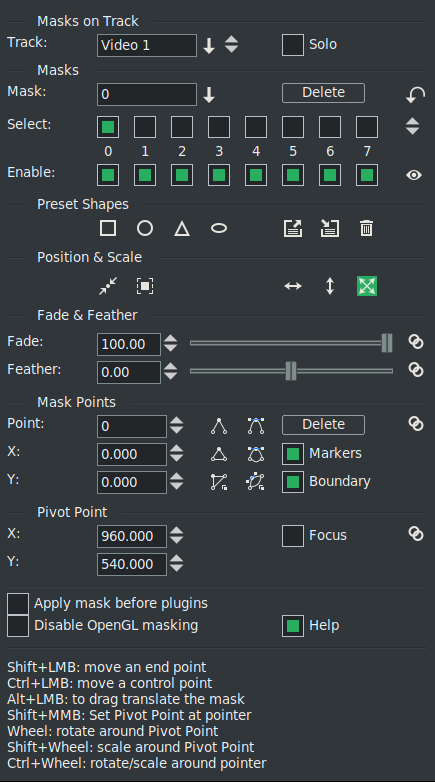
There are a lot more operations you can do using the Mask menu as shown in figure 2.16. Detailed description is provided here next. Note that the Mask window is separated into various sections to make it easier to locate the area of interest.
The Track: textbox displays the different video tracks for your session which will be initially set to the first armed video track or will be left blank if there are no armed tracks. A pulldown to the right of the box brings up the names of all of the video tracks allowing you to change to which track the masking applies. You can also just use the tumbler to easily mouse up/down to get to the desired track. In the pulldown list, any track that has a red colored text name is disarmed so that you can not change it. A track that contains masks has yellow colored text for easy identification. Only when there are no masks on the track, do you have the default text color. This textbox is display only and you can not type into it.
The Solo button in the Masks on Track section of the Mask window is very handy when working with masks on different tracks. It displays just that track so that you see only the track you choose, as well as the tracks behind it to show the mask part. The Solo button is just a convenience to prevent having to mouse over to the patchbay.
The Mask: textbox will show you the mask numbers of 0 - 7 or the 8 ascii character name that you have used to designate each mask number. There is a pulldown on the right side to easily switch to another mask.
The Delete button is used to delete the mask number/name that is selected. The symbol to the right with tooltip of Delete all masks can be used to delete all of the current video track masks.
The Select: row of checkboxes is used to indicate which mask is currently displayed for that video track in the Compositor. Numbers that are colored yellow are active masks for that track. A tumbler to the right allows for quickly changing the mask number displayed.
The Enable row of masks makes it so you can enable all or none of the masks, making it possible to look at no masks or at one mask without interference from the other masks. The symbol that looks like an eye can be used to easily check all or none as the tooltip Show/Hide mask states.
There are 4 shapes that are automatically available for usage as masks – square, circle, triangle, and oval. In addition, the next 3 symbols in this section are for the purpose of loading, saving, and deleting your own customized shapes. The first symbol, Load preset, will bring up a list of your previously saved presets. Clicking on Save preset brings up a popup window allowing you to provide a name used to identify the preset you want to save, along with a pulldown to see the names of your other saved presets. Clicking on Delete preset also brings up a textbox with a pulldown to choose which one to delete. There is a file, called mask_rc, in $HOME/.bcast5 that records your custom masks.
When you click Load preset, keep in mind that it will write the mask number that you have selected so if you already have a mask at that location, it will write over it – just Undo mask under the main window Edit pulldown (shortcut `z'or `Ctrl-z') to revert to the previous if you made this mistake.
Center mask button allows for quickly centering a mask on the video track. Normalize mask button makes it easy to normalize the size of the mask based on the scale of the video - about 1/4 the window size in the X and Y directions. Normalization makes the mask fit in the space to avoid having it wander off of the window, then you can move it around easily before resizing. The next 3 symbols concern the direction to drag translate a mask using the Alt+LMB thus making it easy to preserve the current X or Y value when desirable. For some desktop window managers, such as UbuntuStudio 16.4 and Arch, the Alt key is already in use by the Operating System so you will have to use Alt+Ctrl instead.
xlate/scale x - drag translate constrained in the X direction
xlate/scale y - drag translate constrained in the Y direction
xlate/scale x/y - drag translate in both directions; this is the default and after using the other 2 options, you should reset to this to avoid future confusion while dragging.
The Fade: textbox is used to type in a fade value; the tumbler to the right of the textbox allows you to increase or decrease that number; and the slider bar makes it quick to adjust the fade value. The fader goes from -100 on the left to +100 on the right for negative to positive. Default value is +100. The fade slider includes a sticky point at 0 so that it is easy to get to 0 without going too far or not quite far enough – that way you don’t have to keep jiggling to get there.
In addition there is a Gang fader symbol to allow for having all of the masks fade in unison. The symbol is surrounded by a green colored background 3 when it is in effect. If you have multiple masks with different modes, a decision had to be made on what value to use – it uses the maximum transparency value of the background to determine the operations results. To understand how this works, here is a summary:
Note1: The area outside the mask is referred to as the background.
Note2: The operational result is based on the maximum transparency value of that background.
Feather: works in a similar manner to a gradient Fade aligned on the mask boundary but is a logical function instead of a mathematical function so will be faster. The Gang feather symbol also works in a similar fashion and is surrounded by a colored background when it is in effect.
This section is used to change to a different mask number and manipulate the masks you have created.
The Point: textbox provides the ability to change which point number for the current mask that you want to work on. It has a tumbler to allow for quickly switching the point number. The X: and Y: boxes below reflect the current values and allow for modifying the X/Y coordinates and these too have tumblers. The Delete button will allow for deleting the selected point number.
The next 6 symbols in 2 columns represent Smooth and Linear buttons. Smooth buttons use an algorithm based on the previous point and the next point to create a curved line. The smoothing operation takes three points, A, B, C, and arranges the slope at B to be AC as it moves to the next point for that mask.
smooth point → smooth a single point.
smooth curve → smooth all points on a mask edge curve.
smooth all → smooth all enabled masks on this track.
Linear buttons of linear point, linear curve, and linear all, perform the inverse of the smooth functions. The control point vectors on the bezier endpoints are set to zero magnitude.
In addition there is a Markers and a Boundary checkbox which come in handy to turn off the display of the points and the outline of the mask. Turning off Markers is very useful when you have a lot of control points that clutter the display and make it more difficult to see the actual mask. A helpful feature is available by disabling Markers and enabling Boundary which results in all masks being displayed in the viewer even if they are not enabled; for example you can then see mask 0, mask 1 ...at the same time.
A gang symbol on the right hand side of this section, tooltip of Gang points, is another useful feature that makes it easy to drag a mask to an exact coordinate using the X or Y textbox for numerical input or the associated tumblers. This works like the Alt+LMB drag translate but provides the ability to be precise.
The X: and Y: coordinates mark the value of the current Pivot Point used for rotation, scaling, and translation. You can either directly key in numerical values or use the tumblers to change the values as long as the Focus checkbox is checked.
The Focus checkbox is used in case you want to set a different point in the Compositor for pivoting instead. And the Gang symbol for rotate/scale/translate means that these operations will be performed on all points of the enabled masks. The gang symbol is surrounded by a colored background when it is in effect. When performing a rotate operation on a mask with the mouse wheel, acceleration is in effect – this means the faster you wheel, the more space is covered so that you do not have to wheel dozens of time to make a full rotation. Then when you wheel around slower, you can fine tune the result. Note that in order to be able to rotate/scale around pointer, the Focus checkbox must be unchecked.
Finally there are the Apply masks before plugins and Disable OpenGL masking self-explanatory checkboxes.
Note: Not all OpenGL software can support the current masking methods. If your opengl implementation does not support Shader Version 4.3 or has trouble with this (it is relatively new to opengl at the time this was implemented), then this checkbox will allow you to use the software masking to avoid any potential issues. Normally, OpenGL is probed for the shader version and will automatically use the software implementation if required.
The Help checkbox can be enabled in order to see a list of the keys used to perform various operations. If you use Masking infrequently, these are a valuable reminder to which key combinations to use. Currently they are as follows:
| Shift+LMB | move an end point |
| Ctrl+LMB | move a control point |
| Alt+LMB | to drag translate the mask |
| Shift+MMB | set Pivot Point at pointer |
| Wheel | rotate around Pivot Point |
| Shift+Wheel | scale around Pivot Point |
| Ctrl+Wheel | rotate/scale around pointer |
Note: For some desktop window managers, certain keys may already be in use by the operating system, so you will either have to redefine them in your desktop or use different key combinations. For example, at least some desktops used with UbuntuStudio 16.04 and Arch field the Alt key, thus requiring alternative key combinations to be needed. Below are some of these alternatives.
| LMB | move/create an end point (to move the end point the pointer must be above the point) |
| Shift+LMB | move an end point (the pointer may be near the point, not above it) |
| Ctrl+LMB | move/create a control point |
| Alt+Ctrl+LMB | to drag translate the mask |
| Shift+Key Delete | to delete the mask |
| Shift+MMB | Set Pivot Point at pointer |
| Alt+Wheel | zoom in/out the screen (also available in Ubuntu16 but does not exist in all distros) |
Focus checkbox = unchecked:
| Wheel | rotate around Pivot Point |
| Shift+Wheel | scale around Pivot Point |
| Ctrl+Wheel | rotate around pointer |
| Ctrl+Shift+Wheel | scale around pointer |
Focus checkbox = checked:
| Wheel | rotate around Pivot Point (“Custom focus point”) |
| Shift+Wheel | scale around Pivot Point (“Custom focus point”) |
![\includegraphics[width=0.7\linewidth]{temporary-02.pdf}](img10.gif)